How to Make Yogurt at Home

 How to make homemade yogurtWe are a yogurt loving family! One of the very few things in the world that we can all agree on all the way from the youngest in the family to the oldest. But then we are also a little “high maintenance” when it comes to our yogurt. Well, I guess high maintenance isn’t the right word but I guess we only prefer the real deal, which is a homemade yogurt.

Before my little monkey was born, we were just so used to buy yogurt from a store. It was easy, it didn’t ask for us to wait and there weren’t any chances that it might not set. Then when the little one was around 9-10 months old we got a nanny to take care of her. A gentle and loving Indian lady who on top of being a very loving caregiver to our child, was also a great cook. Someone like my mom who believed in making things from scratch and didn’t cut corners when it came to food. She cooked for the baby and fed her minutes after the food came off the stove, to keep the food fresh and nutrition intact. Needless to say, my baby got used to all the pampering. So did we. Homemade yogurt was a result of the same pampering. After getting used to the homemade version, we just couldn’t go back to store bought one. And now making my own yogurt has just become a part of our routine. Its no hassle and there’s nothing that tastes like it.

Now, if you are someone who like me always thought about all the hassle and uncertainty of making your own yogurt of home, which basically kept you from trying it. Worry no more! Making yogurt at home is as simple as boiling milk. You just need to keep in mind a few small details which I have figured out after several trials and errors but now they will make your life easier… promise! The method that I have adopted is very basic and the simplest and purest way of making yogurt without any fancy cultures or expensive equipments. This is how my mum makes her yogurt and so did her mom. So shall we learn how to make yogurt at home?

How to Make YogurtThings you need to make Yogurt:

  • Milk – 2 liter milk or 1/2 gallon (I prefer whole milk but you can use 2% too)
  • Yogurt Culture – 1/2 cup if store bought and if using homemade yogurt culture then just 2-3 tablespoons should work (If you are making your first batch of yogurt, you will need a small quantity of “active yogurt culture”. Now this can be a small quantity of homemade yogurt you can borrow from a friend or neighbor or you can busy organic store bought yogurt just make sure it has active culture.)
  • A kitchen thermometer (Well, my mom never needed one and she tested the temperature of the milk by dipping the back of her finger into the milk. If the milk was hot but not hot enough for you to be able to dip the finger then she said the milk was just the right temperature. Well, I need a thermometer to save myself from the suspense!)
  • A medium sized pot to boil the milk.
  • Wooden spoon to stir the milk.
  • A small container with airtight lid (I prefer glass or stainless steel over plastic)

How to make Homemade Yogurt:

How to Make YogurtPour milk into the pot and bring it to a boil. 

How to Make Yogurt

Occasionally stir the milk with the spatula to keep it from sticking to the bottom.

How to Make Yogurt

Once the milk comes to a boil, turn the heat off and let the milk cool down to an optimum temperature.

How to Make Yogurt

Somewhere between 120 deg. F to 130 deg. F (49 deg. C to 55 Deg. C) is what’s best for us here. I shoot for somewhere in the middle. And that’s why I use a thermometer mom!

How to Make Yogurt

Transfer the milk into the container you are going to set the yogurt in.

How to Make Yogurt

Now at this stage when you are adding the culture you can either mix a few tablespoons of warm milk into the yogurt culture, mix it and then stir the mixture into the bigger batch of milk OR you can just stir in the yogurt culture directly. Totally upto you. I do the later. 

How to Make Yogurt

Stir well with the spoon to mix the culture in.

How to Make YogurtCover with the lid. 

How to Make Yogurt

Set into a warm, dry place. I set my yogurt in the oven with the oven light on. On cooler day I bring my oven to warm setting (approx. 170 deg. F), then turn the oven off and then place the container with the over light on. Do not forget to turn the oven off or you will end up with something that is NOT yogurt!

 How to make homemade yogurt

Let it sit in the oven to set, overnight. Setting time also depends on several factors like the weather, temperature etc. so if you think the yogurt is still not set after leaving it for the night, just let it stay longer. It’ll take longer but the yogurt will set. The bacteria in the yogurt will not the milk go bad. Also make sure you always save a few tablespoons of the homemade yogurt, as a culture for the next batch.

Notes:

  • Once the yogurt is set to your liking, using a whisk you can make the yogurt smooth and then pop into the refrigerator to keep it from souring. Although for recipes like Kadhi Pakora or Dahi Ke Aloo, I just leave my yogurt outside for a few hours to actually make it a little sour. That elevates the flavor of the dishes.
  • Top with berries, seeds, granola and/or nuts for breakfast. Blend it into a smoothie or as lassi.
  • This is the simplest way to make a very basic yogurt. Since it has no additives you might not be as creamy and thick as the store bought yogurt. If you want prefer your yogurt thicker, add a teaspoon of milk powder into the milk before adding the culture. Use of gelatin also thickens up the yogurt, making it exactly like the ones sold at your local grocery stores.
  • For recipes using thick yogurt, more like greek yogurt, just strain the whey from the yogurt by placing it in cheese cloth and hanging for about 30 minutes. The whey will separate and you will get thick and creamy (greek style) yogurt for recipes like dips and spreads.

A few yogurt recipes:

Bharwan Karela

There are so many ways you can make Bharwan Karela or stuffed bitter gourd as you may call it in simple terms. This particular recipe is kind of a marriage of a few recipes where I tried to pick my favorite parts from different recipe for bharwan karela, some from my mom, some from my mother in law and some parts inspired by different version of the dish I ate over a period of time. So you can say, this is probably the best recipe for bharwan karela because it has the best from them all.

Ingredients:

6-8 – Karela (bitter gourd)- small to medium size
1 1/2 tablespoon + 1 tablespoon- Cooking oil
1 1/2 teaspoon- fennel seeds
1 1/2 teaspoon- nigella
1 cup- onion (thinly sliced)
Salt to taste
1 teaspoon – red chili powder
2 tablespoon- coriander powder
3 tablespoon- Besan (chickpea flour)
1 tablespoon – Amchur (raw mango powder)

Method:

Heat oil in a thick bottom pan. Add fennel seeds and nigella. As they sputter add onion followed by salt. Sauté onion until they are soft and turn golden in color, 8-10 minutes.

Add red chili, coriander, besan and amchur. Sauté on medium heat until you can smell the roasted besan and the mixture in deep golden in color, 8-10 minutes. Transfer to a dish and set aside to let it cool down a little which will make it easier to handle.

In the meantime, prep the karela. Trim the ends of the karela and scrape the pointy ridges just to smooth it out a little. Then make a long incision on the karela lengthwise and scoop the seeds from the inside to create hollow space in the inside. This is where we will stuff the prepared masala.

Take some warm salted water and dip the karela for 8-10 minutes. This process reduces the bitterness of the karela, just a little bit.

Now stuff the karela with prepared onion masala. Press the masala gently inside the karela to make sure its tightly packed so that nothing falls off while we are cooking them.

Heat 1 tablespoon oil in a wok or pan. Gently drop stuffed karela into the wok. Carefully toss them in the oil to coat all the karela with oil. Over medium heat cook the karela, covered, occasionally turning the karela to make sure all the sides are browned and cooked properly. Cooking time for karela should take 15- 20 minutes.

Serve hot as a side.

Sweet and Spicy Tofu and Beans Stir Fry

I am sure I must have played this trumpet many times before, about how busy a working (or any mom for that matter) mom’s life is. Juggling work, chores, playdates and field trips while also trying to feed the family a healthy home cooked meal is not a very easy game to play. As much as the “job” of a mother is the most fulfilling one but it definitely has its moments when you are just plainly frustrated, overwhelmed and lost. And whoever is reading this and saying, “I do not know what the heck you are talking about.”, I bow to you but I have to break this to you- you are one in a million!

Sweet and Spicy Tofu Stir FryLast few weeks have been one of “those” weeks for me, frustrating, overwhelming and making me feel lost. Lost in a puddle of to do lists that never seem to end and then more gets added to it before I get to the end. Summer arriving, last stretch before the school closes and last month before I getaway with the kids to India. But that also means last one month to meet all the deadlines, prep for teachers appreciation weeks, shop for gifts to take back home, book airplane and train tickets, buy gifts for the never ending birthday parties and of course there are colds and fevers thrown in somewhere in between!

Sweet and Sour Asian Tofu and Bean Stir Fry

And then there are four stomachs to feed, three meals a day and also three snack times. Have you calculated how much that adds up to? I haven’t either, but I am sure its a plenty because its making me have a meltdown. “So strategize and plan”, my mom voice keeps repeating in my head. And part of my strategy, I am trying to just keep it simple. No over reaching just planning simple meals and doing it one step at a time.

This recipe is part of that strategy. Its simple, its healthy, comes together in no time and kids think I’ve made something fancy so they enjoy it too. And hey, it also looks pretty, so makes it here on the blog too. More than two birds killed with one stone. I hope you like this strategy of mine and enjoy this quick and simple recipe of Sweet and Spicy Tofu and Beans Stir Fry. 

Ingredients:

1 (14-ounce) package water-packed extra-firm tofu, drained

1/2- 3/4 pound green beans (cut into approx. 2- inch length)

1 tablespoon sesame oil

2 teaspoon sesame seeds

Sauce:

1/4 cup low sodium soy sauce

1 teaspoon sriracha

1/2 teaspoon red chili flakes

1 teaspoon freshly grated ginger

1 1/2 tablespoon honey

2 teaspoon corn starch

Method:

How to make Crispy Tofu in an Oven (using zero oil!):

Press the Tofu:

In order to make crispy baked tofu we need to press it first to squeeze some of the liquid, its soaked in, out of it. In order to do that, drain the water out of the tofu container and wrap it in 3-4 layers of paper towel or in a clean kitchen towel.

Place wrapped tofu on a plate and place a flat dish/plate on it. Place 2-3 heavy bowl on top of the plate to increase the weight on the tofu. Set aside for 20 minutes.

Drain the liquid:

After 20 minutes or so you will see water separated from tofu and the kitchen towel should be all wet. Drain the liquid and unwrap the tofu.

Cut into cubes:

tofuPlace pressed tofu onto a chopping board and cut into a shape you need for the dish you are making. For the stir fry we are making here, we need cubes, so I cut my tofu into cubes.

Baking Process:

tofuPreheat the oven to 350 deg. F.

Line a baking sheet with parchment paper. Line tofu cubes onto the sheet. Transfer the baking sheet into the oven and bake for 10 minutes each side, 20 minutes total or until the tofu is golden and crispy.

tofuMaking of the Sweet and Spicy Tofu Stir Fry:

Bring all the ingredients of sauce, together into a bowl . Using a whisk, gently whisk them all together.

Transfer tofu into a ziplock bag. Pour in the sauce in the ziplock bag. Close the ziplock bag tightly and gently shake the bag for the sauce to coat all the tofu.

Heat oil in a sauté pan or a wok. Drop in a the green beans. Toss gently to coat green beans with oil. Cook for 3-5 minutes, on medium heat, tossing in intervals.

Transfer all the ingredients in the ziplock bag, into the wok/sauté pan. Toss everything gently, over medium high heat, for the sauce to thicken and at the same coat all the beans and tofu, approx. 3-5 minutes.

Turn off the heat. Sprinkle sesame seeds on top. Serve over a bed of steamed rice.

NOTES:

  • It always helps to place the wrapped tofu in a plate with elevated rims or a flat pasta bowl, to keep the liquid from draining out of the plate and make a mess.
  • You do not want your tofu to be completely dry so keep checking on it once in a while when baking in the oven. Different ovens work differently and the size and shape of the tofu also determines the bake time.
  • Use a whisk to mix the sauce ingredients in a bowl to make cornstarch is mixed in as well and there’s no lumps left.
  • We want to keep the green beans crunchy but still slightly softened on the outside so if you think 5 minutes is too much for the variety of beans you are using, just adjust cook time accordingly.
  • Feel Free to substitute green beans with any other green like broccoli, kale, brussel sprouts or you can even throw in some mushroom and sugar snap peas.

Apple Fritters

Apple FritterIngredients:

1 cup whole wheat flour

1 3/4 cup apple (approx. two apples, peeled and diced)

1 1/2 tablespoon sugar

1/2 cup milk

1 egg

1 teaspoon cinnamon powder

zest of 1 medium lemon

1 teaspoon baking soda (1/2 teaspoon ENO fruit salt works even better!)

a pinch of salt

Extras:

powdered sugar or a half and half mixture of sugar and cinnamon powder to toss the fritters in.

Method:

In a mixing bowl mix all the dry ingredients together. Set aside.

In another bowl whisk sugar and egg together. Once incorporated add milk. Mix well.

In small portions add dry ingredients into the wet ingredients. Stir in apples. Mix until its all incorporated properly. Let it sit for 10 minutes.

Heat oil in a deep fryer or wok to a temperature of 350 deg. F.

Using a spoon or a small cookie scoop, pick approx. 1 tablespoon portion of batter and drop in hot oil. Fry until the fritter is brown and light.

Take it out of the oil and into a dish line with paper towel to drain excess oil.

Serve hot. For extra flavor sprinkle powdered sugar on to or toss in a mixture of cinnamon sugar coating a thin layer outside of the fritter. Enjoy!

Minty Potatoes (Pudine Ke Aloo)

Mint is one of my favorite herbs not just because my kids love EVERYTHING mint, be it a drink, an ice cream or paired with a vegetable to spruce it up, but also because of the aroma with which the house is just filled every time you pull a sprig out or cook with it in the kitchen. Its the makes everything smell and taste so refreshing and summery. Another big pro for me is the ease with which you can just grown mint in your kitchen. Considering the lack of green thumb that I have, I have practically succeeded in killing any plant that I have decided to grow in my kitchen but not mint, ladies and gentleman! It looks like it died but then you show it some love and it comes back up again. And recently it has been highjacking pretty my whole kitchen garden and as a result we have been cooking a lot with it lately.

This humble recipe is one of the dishes that we have been cooking on repeat in our household for the past few weeks. Its also perfect to be included as part of our “Everyday Indian Cooking” series where I share quick recipe videos of simple indian dishes cooked in our Indian kitchen. So enjoy this family favorite: Pudine Ke Aloo or Minty Potatoes as my kiddo calls them. Pudine Ke Aloo

Ingredients:

Potatoes (medium sized)- 3-4 (Peeled and thinly sliced)

Cooking Oil- 2 tablespoon

Nigella seeds- 1 teaspoon

Turmeric- 1 teaspoon

Salt to taste

Mint Leaves- 1/2 cups (washed, julienned)

Whole Green Chili- 3-4

Method:

Heat oil in a thick bottom pan. As the oil heats up, add nigella.

As nigella sputters add turmeric. Give it a quick stir. Add sliced potatoes. Stir to mix everything well together. Cook on medium heat, until the potatoes are cooked a little over half way through, 8-10 minutes, stirring occasionally.

Add salt. Cook for another 5 minutes. By this time to potatoes will start turing golden in color.

Now add mint leaves and whole chili. Stir it all together. Cover and finish of the cooking for another 1-2 minutes just to make the chilis a little tender.

Serve as lunchbox food or a side for lunch or dinner, paired with puri or paratha.


Instant Pot Chana Dal Lauki

ChanaDalLauki

Ingredients:

1 1/2 cup split chana dal (split chickpeas/bengal gram), washed until clear water

1 medium bottle gourd (cleaned, peeled, cored and cut into 1 1/2″ chunks)

1 cup tomato (diced)

2 black cardamom

4-5 cloves

1 inch cinnamon

1 teaspoon turmeric

Salt

2 tablespoon oil

1 teaspoon cumin

1 tablespoon ginger garlic paste (preferably fresh)

1/2 cup red onion (chopped)

1-2 thai green chili (minced)

1 tablespoon ghee

1 teaspoon garam masala powder

1/4 cup cilantro (chopped)

Method:

In a pressure cooker or large pot bring dal, bottle gourd, tomato, black cardamom, cloves, cinnamon, turmeric and salt together. Add water (3 cups if cooking in pressure cooker, 6 or more if cooking in a pot). Cook until the lentils are cooked through, about 20 minutes or so.

Once the lentils are cooked through, set them aside and work on the masala.

Heat ghee or oil in a thick bottom pan. Add cumin. As it sputters add ginger garlic paste. Cook for a minute or until ginger garlic paste begins to turn golden. Add onion. Cook for 3-5 minutes on medium heat. Add 2 tablespoon water. Mix well. Add garam masala. Mix. Cook for another minute until oil starts to seperate.

Add cooked lentils. Mix well. Simmer for 2-3 minutes. Turn off the heat. Garnish with cilantro. Serve as a soup with some bread or pour a couple ladles over steamed rice or quinoa. Comfort food at its best!


Aloo Shimla Mirch Ki Sabzi

Aloo Shimla Mirch

Ingredients:

1 cup potatoes (any variety) (peeled and diced)

1 1/2 cup bell pepper (cut into 1/2 inch pieces)

2 tablespoon cooking oil (I use canola)

2-3 garlic cloves, about 1 tbsp (sliced)

1 teaspoon turmeric

Salt to taste

1 1/2 teaspoon amchoor (dried mango powder)

1 teaspoon fennel powder (crushed fennel seeds)

1 teaspoon red chili powder

Method:

Heat oil in a thick bottom pan. Add garlic slices. Cook for a few seconds until they begin to turn golden.

Add turmeric. Give it a quick stir. Add potatoes followed by salt. Cook potatoes, stirring occasionally until they turn golden brown in color, 8-10 minutes.

Add bell pepper, followed by amchoor (dried mango powder), fennel powder and chili powder. Cook until the potatoes are cooked through but the bell peppers will still be crunchy, 12-15 minutes. Stir occasionally. Serve hot with parathas.

Kale and Brussel Sprouts Salad with Turmeric Honey Yogurt Dressing

Kale and Brussel Sprouts Salad with Turmeric Honey Yogurt DressingTurmeric or Haldi as we say in hindi, has been an integral part of not just Indian kitchen but our lives, I have to say. If there was a king (or in my opinion a queen) of spices in India then it has to be haldi (turmeric). Be it dadi (grandma) tossing it with salt and mangoes before spreading them out in the terrace to dry for pickling, or be it by the side of a young blushing bride (or groom) surrounded by friends and family under her mandap for the sacred haldi ceremony.

Kale and Brussel Sprouts Salad with Turmeric Honey Yogurt Dressing

Mummy imprinting her palms with haldi on the doorstep before any sacred ritual, using as a facepack for a clearer, shinier skin, rubbing on our scrapes and wounds growing up, mixing with honey to cure a sore throat, or on the belly button to relieve a stomach ache. Fresh, dried or powdered, turmeric has always been a mother’s closest friend. Passed down through generations and still holding its vigour.

Kale and Brussel Sprouts Salad with Turmeric Honey Yogurt Dressing

So when I watch this recent craze everywhere about this “turmeric- the golden spice”, it amuses me and makes me go, “yes, told you so!”. The “golden milk” that is crowding the shelves of our grocery stores recently and being sold by baristas everywhere has been a staple remedy for fever, ache or fatigue for ages, where I come from.

Kale and Brussel Sprouts Salad with Turmeric Honey Yogurt Dressing

Not just in the Indian culture but there’s a sacred place of turmeric in Ayurveda too and rightfully so. Curcuminoids, the compound in turmeric, the main ingredient of which curcumin has amazing anti- inflammatory effects and is an antioxidant. Great booster of brain health, it is also believed to help with heart disease and even cancer. So the right dose of turmeric in your diet is not just healthy but is also necessary according to Ayurveda for a happy mind and soul.

Kale and Brussel Sprouts Salad with Turmeric Honey Yogurt DressingSo today the recipe I created for my very dear friend Kankana, who is currently on a much deserved trip to India, revisiting the old streets of her childhood and savoring through her mom’s cooking, I have brought to you the same golden spice! I picked a few of my mom’s favorite health boosting ingredients and mixed them with some of mine. Turmeric, honey and yogurt, three things my mom always gave us as kids to boost our immune system. I mixed them with my favorites, Kale, brussel sprouts and lemon, to bring you this refreshing and absolutely delicious salad. You can call the dressing a “golden dressing” if you please but it sure packs all the nutrition you would need for a well rounded meal.

Kale and Brussel Sprouts Salad with Turmeric Honey Yogurt Dressing

Please checkout the recipe for Kale and Brussel Sprouts Salad with Turmeric Honey Yogurt Dressing, over at Kankana’s blog Playful Cooking.

Aloo Soya Ki Sabzi- Vegan Potato and Soy Curry

Papa HATED soy chunks or Nutrela as we commonly call in India. He just has this aversion to it that I could never understand as a kid and still do not get it, because I loved it even as a little picky eater. Dinner table would turn into a sulking ground on the days Mummy made Aloo and Soya Chunks ki sabzi. I have my suspicions that Mummy purposely cooked them specially on the days Papa messed up, as a revenge. She vehemently denies these allegations! Whatever be the case I loved the days this was dinner and fished the soy chunks out of Papa’s plate too which he happily allowed. So every time I cook this curry at home I cannot help but get amused by these chunks of memories from the childhood and get a chuckle out of it. More so because this is one of those dishes when cooked in my family, dinnertime is breeze because my kids love soy chunks and the husband too. So feel bad for you Mummy, sorry! 😉

Aloo Soya Ki Sabzi
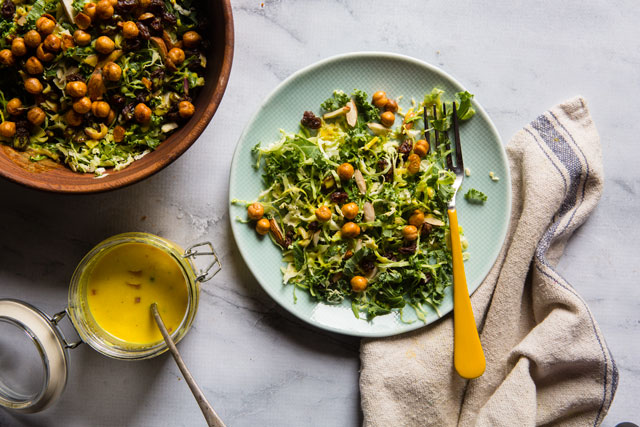
As a part of my venture to bring Everyday Indian Cooking closer to you and make it more approachable, I am sharing this simple curry recipe for Aloo Soya Ki Sabzi or in simpler words, a Vegan Potato and Soy Curry. A great protein rich dish for our vegan and vegetarian friends and a light and simple curry, easy enough to be put together even on busy weeknights. Hope you Enjoy.

Ingredients:

1 cup Soy Chunks (Nutrela)

3 tablespoon cooking oil (I used canola)

1 teaspoon cumin seeds

1/2 cup onion (chopped)

1 teaspoon turmeric

1 teaspoon red chili powder (cayenne)

1 tablespoon coriander powder

1 teaspoon garam masala

Salt to taste

1 1/2 tablespoon ginger garlic paste

1 1/2 cups tomato (chopped)

2 medium potatoes (peeled and cubed)

Water

1/4 cup cilantro (for garnish)

Method:

In a large bowl soak soy chunks in about 2-3 cups of water. Let it soak for 15-20 minutes until dried soy chunks puff up to a spongy ball. Squeeze the water out of the soy chunks. Set aside.

Heat 1 tablespoon oil in a thick bottom pan. Throw in the soy chunks, stir and pan fry until the soy chunks turn golden in color. Take them out of the pan. Set aside.

Heat remaining 2 tablespoon of oil in the same pan. Add cumin seeds. As they sputter add onion. Cook until the onion browns, 3-5 minutes on medium heat.

Add turmeric, chili, coriander, garam masala and salt. Give it a quick stir then add ginger garlic paste followed by 2 tablespoons of water. Cook the masala for a quick minute.

Throw in the tomatoes. Cook the masala until the tomatoes are cooked through and turn into a loose paste.

Throw in the potatoes, fried soy chunks and about 2 cups of water. Cover and cook on medium low heat until the potatoes are cooked through, 8-10 minutes.

Turn off the heat. Garnish with cilantro. Serve hot with rice or roti.

Grilled Bombay Sandwich

Grilled BOmbay Sandwich

My four close girlfriends and I, we the famous (or infamous) gang of five, carefree girls who were the talk of the college because of some reason or another. Sometimes because of what we did, or wore or said and many times for the lack of. If you grew up in a small city in India you can imagine how jarring the surrounding can be for someone like us, specially for a girl. Although we couldn’t care less and probably that was what bothered the other students and teachers more. We were in the college to enjoy our golden days and were lucky to have found each other, a bunch of like minded crazies.

Grilled BOmbay Sandwich

We stepped out of the examination hall after writing our last exam for undergrad and we could actually feel the wind beneath our wings. But then this thought also sank inside that probably all this is going to be over soon. The five of us, as much as we enjoyed each others company, we also wanted different things in the next phase of our lives. One of us wanted to enter the field of research, a couple into science, one wanted to go into designing and I wanted to write. So it was also time to part ways. Not permanently but from the day today mischief and daily hang outs.

Grilled BOmbay Sandwich

So probably one last hoorah before we take the plunge?

A girls trip!

Yes, that would be fun!

Just us?

That would be exciting but also scary. We hadn’t taken one ever before.

But then that’s the adventure we were looking for. So we decided, lets go to a new city and paint it red for a week.

But where?

Mumbai of course! That’s a no brainer.

The largest, most happening city in India. Bustling and exciting but at the same time safe for a bunch of young girls roaming the streets on their own. A good reason parents would look for before giving us the approval to take this trip. An approval, the presence of which is very important for a middle class girl in India, at 21… even at 36 and 50.

Lucky us, we got one!

Grilled BOmbay Sandwich

Mumbai it is! Date was decided, tickets were bought and bags were packed. We were nervous but at the same time couldn’t wait to jump on that train and travel to the city where dreams were made, nights were always young and where maybe we could fly a little. Although just for a week but the mere idea was exciting and more exciting was the fact that we were doing it together.

Grilled BOmbay Sandwich

Finally the day came and we did hop on that train and landed in Mumbai and spent one glorious week there. That was an amazing trip. We travelled in local trains and buses packed with people, we strolled the city at night without anyone stopping or even noticing us, we wore what we wanted and no one cared, we ate like hogs at the roadside stalls, we ran on the beach with sand sliding from under our feet and water splashing in our faces. It was freeing and liberating, a feeling we were always looking for in our hometown but now got the privilege of. Even in those penny pinching days, that was one of the best trips I ever took in my life and I am so glad I did because its been over a decade now and I still remember each and every emotion and experience I went through.

Grilled BOmbay Sandwich

There were several highlights in that trip, but you know the one I will talk about here will be about food, right? Mumbai is just a treasure land when it comes to the food. Kind of a melting pot of so many cuisines for Mumbai also shelters people from all over India and the world. The food scene there clearly represents that diversity. Much like any other town or city in India street food stalls are the meeting points of people in the evening. Office goers making a pit stop before heading back home to retire, college and school kids sharing a laugh or two with friends, busy workers catching a breath for a few moments. These food stalls give them a spot for that and gives them some cheap but delicious food and that much needed comfort. Fills them up for a while and peps up to tackle the rest of the day.  From vada pav to dosas to kulfis and kababs to parsi chai and bombay sandwich.

Grilled BOmbay Sandwich

Yes Bombay Sandwich! Just a simple sandwich with layers of butter, simple chutney and vegetables but is hugely popular there and once you have a bite of one, by the roadside, amongst all the hustle and madness, you will know why. Pair with a sweet cardamom tea and you are set. A typical Bombay sandwich isn’t grilled but you will find several versions of it at the food stalls, restaurants and homes. I personally like this one the best. A crispy golden crust adds to the flavor of this simple sandwich.

Ingredients: Makes 2 sandwiches

4 slices of bread (white, wheat, multigrain anything is fine)

1 medium sized potato (boiled, peeled and sliced in circles)

1 small onion (peeled and sliced in circles)

1 medium sized tomato (sliced in circles)

1 medium beetroot (baked or boiled, peeled, sliced in circles)

1 medium sized bell pepper (Cored and sliced)

softened butter (to spread on the slices of bread)

1/4 cup hot cilantro chutney

1 tablespoon Chaat Masala

Salt to taste

Method:

Spread butter on one side of both the breads for a sandwich. Followed by a layer of hot cilantro chutney.

Place veggie slices on the bread one after the other.

Sprinkle chaat masala followed by salt. Place the other slice of bread on top to complete the layering of the sandwich.

Butter the outside of the sandwich breads.

Heat a grill or a panini maker. Grill the sandwich by pressing from top. Cook for 2-3 minutes on medium high heat until the sandwich has grill marks and the bread turn golden from the outside.

Transfer to a chopping block before serving. Cut the sandwich diagonally into two triangles. Serve hot with green chutney or tomato ketchup as a dip.

Instant Paniyaram – 4 Ways

Ingredients:

BASIC PANIYARAM BATTER:

1 cup coarse semolina

1 cup greek yogurt

1 cup water

1 teaspoon fruit salt (I used eno)

Salt to taste

Oil

Method:

Bring semolina, yogurt and water, together in a large mixing bowl. Whisk, until the batter is smooth. Let rest for 15-20 minutes.

Add fruit salt (eno) and salt to the batter. Mix well.

Heat a paniyaram pan or a takoyaki pan or a stuffed danish pan, on medium heat. Add, a drop of oil in each mini well. Followed by 1 tablespoon batter in each well. Cover and cook for 2-3 minutes until the surfcae touching the well is browned.

Uncover, using a small spoon turn the balls, upside down. Cover and continure cooking for another 2-3 minutes until the surface is brown.

Take the paniyaram out of the pan. Serve hot with dip and chai.

CHEESE PANIYARAM:

Ingredients:

Batter recipe same as Basic Instant Paniyaram (mentioned above)

3-4 cheese sticks (cut into small pieces)

Method:

Bring semolina, yogurt and water, together in a large mixing bowl. Whisk, until the batter is smooth. Let rest for 15-20 minutes.

Add fruit salt (eno) and salt to the batter. Mix well.

Heat a paniyaram pan or a takoyaki pan or a stuffed danish pan, on medium heat. Add, a drop of oil in each mini well. Followed by 1 teaspoon of batter. Drop a piece of cheese, followed by another teaspoon of batter to cover the cheese. Cover and cook for 2-3 minutes until the surface touching the well is browned.

Uncover, using a small spoon turn the balls, upside down. Cover and continure cooking for another 2-3 minutes until the surface is brown.

Take the paniyaram out of the pan. Serve hot.

MASALA PANIYARAM:

Ingredients:

Batter recipe same as Basic Instant Paniyaram (mentioned above)

1 cup Spicy peas and potato filling (or any filling of your choice, can be keema filling, grated veggies or anything you like)

Method:

Bring semolina, yogurt and water, together in a large mixing bowl. Whisk, until the batter is smooth. Let rest for 15-20 minutes.

Add fruit salt (eno) and salt to the batter. Mix well.

Heat a paniyaram pan or a takoyaki pan or a stuffed danish pan, on medium heat. Add, a drop of oil in each mini well. Followed by 1 teaspoon of batter. Drop a small ball of filling, followed by another teaspoon of batter to cover the filling. Cover and cook for 2-3 minutes until the surface touching the well is browned.

Uncover, using a small spoon turn the balls, upside down. Cover and continure cooking for another 2-3 minutes until the surface is brown.

Take the paniyaram out of the pan. Serve hot.

NUTELLA PANIYARAM:

Batter recipe same as Basic Instant Paniyaram (mentioned above)

1/2 cup nutella

Method:

Bring semolina, yogurt and water, together in a large mixing bowl. Whisk, until the batter is smooth. Let rest for 15-20 minutes.

Add fruit salt (eno) and salt to the batter. Mix well.

Heat a paniyaram pan or a takoyaki pan or a stuffed danish pan, on medium heat. Add, a drop of oil in each mini well. Followed by 1 teaspoon of batter. Drop a small ball of nutella, followed by another teaspoon of batter to cover the filling. Cover and cook for 2-3 minutes until the surface touching the well is browned.

Uncover, using a small spoon turn the balls, upside down. Cover and continure cooking for another 2-3 minutes until the surface is brown.

Take the paniyaram out of the pan.

Spinach Dhokla

Spinach DhoklaThat sound of the footsteps, of her getting out of her room and hastily approaching the living room, where I usually sit in the morning sipping my chai, is just the perfect start to a day. She knows that she would find me there because even while rubbing her sleepy eyes with both her hands, she knows exactly which way to go. Then a gentle whine at the first sight of me, she’d lift those arms to be picked and hugged. A hug, the warmth of which even a hot cup of ginger chai in the morning couldn’t deliver.

Spinach DhoklaThen after next 10 minutes of just careless lazing and yawning, the little monkey and I walk back to her room again where her sister is still hiding under the comforter. Some regular complains of how they never get enough sleep, to how far the bathroom is from her bed and cold the whole house is, we finally get the morning moving.

Spinach DhoklaYou never think of this, when you are in the thick of those whining and complains, that a few hours later when you would be sitting on your work table trying to write a few things of substance, all you wanna do is go back to the morning cuddles and lazy hugs. Today is one such day. After a rather busy day when I finally get a chance to sit and work, all I wanna do is wrap this up and pick them up from school and just go back to those delicious and intoxicating cuddles and hugs.

Spinach Dhokla

Maybe I’ll do that! As soon as I am done telling you about this delicious and intoxicating Spinach Dhokla I made. Light as feather, a touch sweet and a touch tangy, this spinach and chickpea flour steamed cake will just melt in your mouth and only leave you craving for more. And you can and should eat more because these are healthy and simple to make. I personally like the addition of water in the tadka, that makes these savory cakes extra moist and its just an added perk to an already tasty dish. Serve these an an appetizer, finger food, breakfast or lunchbox food.

Spinach DhoklaIngredients:

For Dhokla:

1 cup Besan, chickpea flour (ladoo besan or coarse chickpea flour works best)

2 cups Spinach (washed, with stalks)

1/2 cup yogurt (whisked)

1 teaspoon ginger paste (fresh)

2 green chili

2 tablespoon cooking oil

1 tablespoon sugar

1 1/2 teaspoon lemon juice

Salt to taste

Water as required

1 teaspoon Fruit Salt (I used Eno brand)

For Tempering:

1 tablespoon cooking oil

1 pinch asefetida

1 tablespoon curry leaves (chopped)

1 green chili (chopped)

1 teaspoon black mustard seeds

2 teaspoon sesame seeds

2-3 tablespoon water

Method:

Blanch spinach- Boil water in a small put or a saucepan. Drop spinach in boiling water. And in a minute transfer it to an ice cold water.

Strain the water and blend blanched spinach in a blender. Set aside.

In a large mixing bowl bring all the ingredients of dhokla together, including the spinach puree. Hold on to the fruit salt for now. Using a whisk, mix all the ingredients together, leaving no lumps. Add water to thin out the batter. Batter should be flowing like pancake batter, not to thick or thin. Set aside.

Get the dhokla steamer ready if you have it. If you do not have a dhokla steamer you can use a make shift dhokla steamer with a spring foam pan and a pot large enough to accommodate the cheesecake pan.

Grease an 8″spring foam pan. And warm about 1 1/2 cups on water in a large pot. Place a small bowls in the pot, facedown. These bowls will elevate the spring foam pan from the water and will create a steamer for the dhokla to cook.

Stir in fruit salt to the dhokla batter. Transfer the batter to the spring foam pan. Carefully drop the spring foam pan so that it rests on the back of the inverted bowls. Cover the pot. Cook on medium low heat for 15-20 minutes until a the tester knife comes out clean.

Once cooked, carefully pull the dhokla pan out of the steamer. Let it cool for 15-20 minutes. Once cool, run a knife around the edges of the pan and flip the dhokla out of the pan into a plate or serving dish. Set aside.

For the tempering:

Heat oil in a tempering pan or a small saute pan. Add asefetida. Once it sizzles drop rest of the ingredients in the order written in the list. Hold on to the water. We do not add water yet.

When all the spices and seeds start sputter, turn the heat off. Now add water, one tablespoon at a time. be careful while adding water as it might sputter. 

Now spoon the prepared tempering on top of the steamed dhokla, making sure you cover the surface of the dhokla.

Cut dhokla into squares. Serve warm with a cup of chai.