40+ Holi Recipes

Out of all the festivals, Holi and Diwali are two which have always been special growing up. Holi probably more so because it was one day the days when you could officially go mad and it was not only ok but there were chances that you will find someone around you who would go crazier than you. A fun filled day pouring with laughter, color and delicious food. The air would be filled with the sound of upbeat bollywood numbers and the aroma of gujiya, besan papdi and gulab jamuns fried in every kitchen in the gully.

Holis here in the US are much different from the ones I grew up celebrating. Not everyone around you in the neighborhood is used to the idea or concept. But that doesn’t stop us from trying to educate them and lure them in with good food and fun. So if you want to spread the love and madness of holi around and kinda looking for a few fun recipe ideas then look no more. What are we here for? We have a list of more than 40 Holi Recipes categorized here for you. Take your pick and enjoy the festival of colors!

SAVORY:

Chickpea- garlic fries

Chickpeas- Roasted Garlic Fries

Batata Vada 

Crispy Rice Vada

Kumaoni Vada

Sabudana Vada Tots

Sabudana Vada Tots

Bread Katori Chat

Methi Mathri 

Besan Papdi 

Paneer stuffed mirchi bhaji 

Dahi Vada

Dahi Vada

Onion Pakora 

Paneer Pakora 

Wonton Samosa Khasta Kachori 

Poha Mixture

Salty Spinach Crackers

SWEET:

Diwali sweetsGujiya

Gulgule 

Malai Laddu

Gur Ka Halwa

Balushahi

Shahi Tukda 

Ghoriba

Khira Gaintha

Instant Malpua 

Thandai Firni 

Thekua 

Carrot Halwa 

Apple Halwa

Kesar Kalakand 

Thandai Shahi Tukda 

Manda Pitha

DRINKS:

Thandai

Thandai Masala

Rooh Afza Sharbat 

Nimbu Pudina Sharbat 

Iced Masala Chai

Mango Ginger IcedTea

Masala Doodh Powder

Spiced Guava Lemonade

Cardamom Mint Lassi

Mattha (Indian Spiced Yogurt Drink)

spiced buttermilk

Wish you all a happy and colorful Holi!

Aloo Methi Recipe

Aloo Methi

This year we celebrated our 12th Valentines Day together. 12 years together… filled with laughter and some tears. Some kisses and some fights. Some planning and some surprises. Some smooth sails and some set backs. Yes, all of that but always together. That’s what love, commitment and marriage is all about right? Whatever comes in the way, doing it all together. What a fulfilling twelve years these have been and I cannot wait for more!
Aloo Methi

Now even after twelve years of all that I still cannot understand all the hoopla over Valentines Day. Didn’t understand in the beginning, do not understand it still. Maybe we are just boring people (i personally wouldn’t call myself that!) or maybe we are old but why pick just one day to show your love. Shouldn’t it be everyday, with little things in life. But hey, who am I to speak? I’m no expert. Although I did enjoy all the delectable eye candies people posted on their Instagram and Facebook feeds. Lines outside the gift stores and flower shops. Chocolate wrappers littered around my house from the couch to the bathroom floor, thanks to my two little monsters and the schools celebrating the day with them. 
Aloo Methi

Yes, we did enjoy all of that but we also decided to skip it to stay back at home. Nourished our souls with some old school, simple “desi khana” (Indian comfort food). He made the bed, instead of buying expensive gifts and I cooked up a storm in the kitchen which made me happy and him too. He sneaked out of work a little early to surprise me and the kids and we played carrom board with the kids for the first time, a game of our childhood. Then we devoured on some ghee laced yellow dal, crispy okra, hot puffed roti and Aloo Methi, all of his favorites and mine.

Wrapped up the day by sharing a bowl of sweet kheer (rice pudding) while watching our favorite movie. It was a very successful Valentines Day in my opinion or was it just another day with him, in my book? Oh who knows and who cares!

Enjoy this Aloo Methi recipe (Potatoes cooked with Fenugreek Leaves). Its a simple everyday side dish in a typical north Indian home. You can make this with either fresh leaves (washed and finely chopped) or with Kasuri Methi which is basically dried fenugreek leaves packed and sold. Depending on the availability you can tweak the recipe. Both versions shared below.

Ingredients:

3 medium sized potatoes (peeled and cut into one inch cubes)

2 cloves garlic (chopped)

1 teaspoon fenugreek seeds

2 whole dried red chili

1/2 teaspoon turmeric

Salt

2 tablespoon cooking oil (I used mustard oil)

3/4 cup Kasuri Methi (dried fenugreek leaves) OR 3 cups fresh methi leaves (cleaned, finely chopped)

Method:

Heat oil in a heavy bottom pan. Add garlic, fenugreek seeds and whole red chili. As they turn golden brown, add potatoes, in 10 seconds or so.

Cook the potatoes over medium heat until golden brown, 8-10 minutes. When using kasuri methi and not fresh onesI usually cover the potatoes after 5 minutes and cook them , stirring occasionally until they are cooked, al dante. Stir in turmeric and salt.

If using fresh fenugreek leaves you can add them at this point. Stir well. Cover and cook on medium heat until the leaves are cooked, 5-8 minutes. Stir occasionally. Finish off the cooking process by cooking last 2 minutes uncovered, stirring well.

If using Kasuri methi add to al-dante potatoes. Mix well. Add 2-3 tablespoon of water. Cover and finish cooking for 3-5 minutes over medium low heat.

Aloo Methi


Kids Lunch Box- Falafel Broccoli Bites

Healthy Falafal

My kids love finger food specially for school lunch and I love packing it for them too. They love them because it isn’t messy and they do not need to run for napkins or washroom after a meal. Not that they would even if they had to! I like them because they are easier to pack, I do not have to worry about lunch box leaks and they are fun to play around with. So I try to play around with recipes for some of their favorite finger foods and since I cannot stop being the “boring mom” who wants to stuff their kids with healthy food, I try to sneak some in these recipes too. This particular one is a favorite, mine and the kiddos’ too. Falafel Broccoli Bites.

Ingredients:

1 can chickpeas (drained and washed throughly)

1/2 cup cilantro

1 cup steamed broccoli

1 clove garlic

1/4 cup red onion (diced)

1/2 teaspoon cumin seeds

1/2 teaspoon cayenne (adjust per taste)

1/4 teaspoon baking soda

1/4 cup whole wheat flour (can substitute with 1/3 all purpose flour)

Salt

Oil for deep frying

Method:

In a food processor bring together broccoli, garlic, onion, cumin, cayenne, cilantro and salt. Pulse for a few times to make coarse meal. Scrape out into a mixing bowl. Set aside.

In the same food processor transfer the chickpeas. Coarsely process the chickpeas. Transfer to the mixing bowl with the rest of the ingredients. Using hand or spatula mix it all together. Sprinkle salt, baking soda and flour on top. Gently incorporate everything together.

Scoop one tablespoon portion at a time and roll the mixture into balls or oblong or any shape of your choice. Whatever the kids would like. Line on a baking sheet or plate.

At this point you can either pop the falafel balls in the refrigerator to be use within 2-3 days or can deep fry immediately.

I sent them with ketchup as a dip for the little monkey and the butterfly prefers it with ranch. Green apples and chocolate filled cookies went along as a snack.

Kids Lunch Box- Turkey Meatballs

Turkey Meatball

Mini Turkey Meatballs will be their lunch today. Sent them along with sautéed broccoli, raisins, salted pistachios, and orange.

Ingredients: 
1 1/2 cup ground turkey
1 teaspoon roasted cumin seeds
1 teaspoon ginger garlic paste (freshly grated)
2 tablespoon parmesan cheese (grated)
Salt to taste
1 slice bread
2 tablespoon milk
1/2 cup cilantro (chopped)
Oil to pan fry

Method:

Cut bread into smaller pieces. Soak in milk for 5 minutes. Mash soft bread in the milk to make a paste.
In a mixing bowl bring together ground turkey and all the other ingredients except for oil. Using hand or a fork mix everything well together. Take one teaspoon of mixture at a time and roll them into mini balls. Line on a plate.
At this point you can either refrigerate the uncooked meatballs to be used next morning before packing the lunch or can cook them immediately.
Heat oil in a thick bottom sauté pan. Line the meatballs on the pan without crowding them. Cook on medium heat turning sides and browning the meatballs from all sides until cook through, approx. 8-10 minutes.
Pack in the lunch box to be devoured with a dip or just as is!

Arvi Kabab (Taro Root Kababs)

Arvi KababLast night I had one of those moments when as a mom you are just about to burst and you just try your best to keep it all inside. Well, I might have had a little outburst still but lets just act like that never happened!

Arvi KababSo it was a busy day, like any other and I was just trying to “smooth sail”, like that that ever happens! Morning rush, followed by a good one hour at the gym (which was probably the only highlight of the day!), followed by work, which you must know if you “work from home” that it also means picking up the toys from the floor while on a conference call, doing the dishes while dictating an email, and eating cereal for lunch while working on the assignment. So somehow got some work done and left a lot undone because it was time to pick up the kids from school. Kids got picked up, then rush to the butterfly’s piano class. By the time we make it home I am already done for the day but the kids still need to be bathed, dinner still needs to be cooked, story books still need to be read, homework still needs to be finished and…….. yup!

Arvi KababArvi KababNow like a good mom (that I can only try to be!), I patiently strive through all of that and end up on the dinner table, ON TIME…. with hot cooked food in front of us. The little one, takes the first bite, gags and spits it out. I tell her, that’s not how you treat your food. She takes another bite and spits it out again. AND that it… I was just about done at this point and I just burst. Luckily god sent the husband back from work, right then and nobody got hurt! Not proud of myself for doing so but definitely empathetic….of myself.

Arvi Kabab
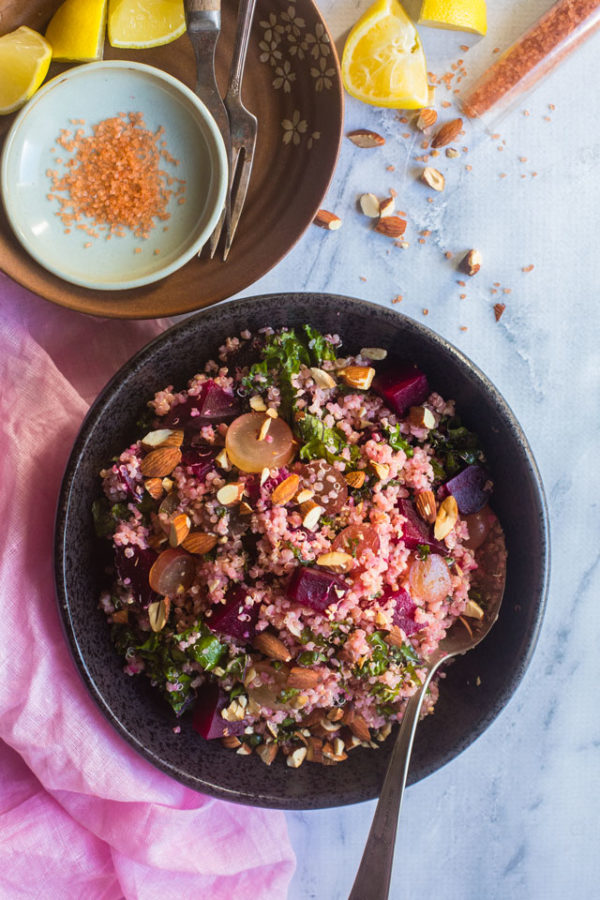
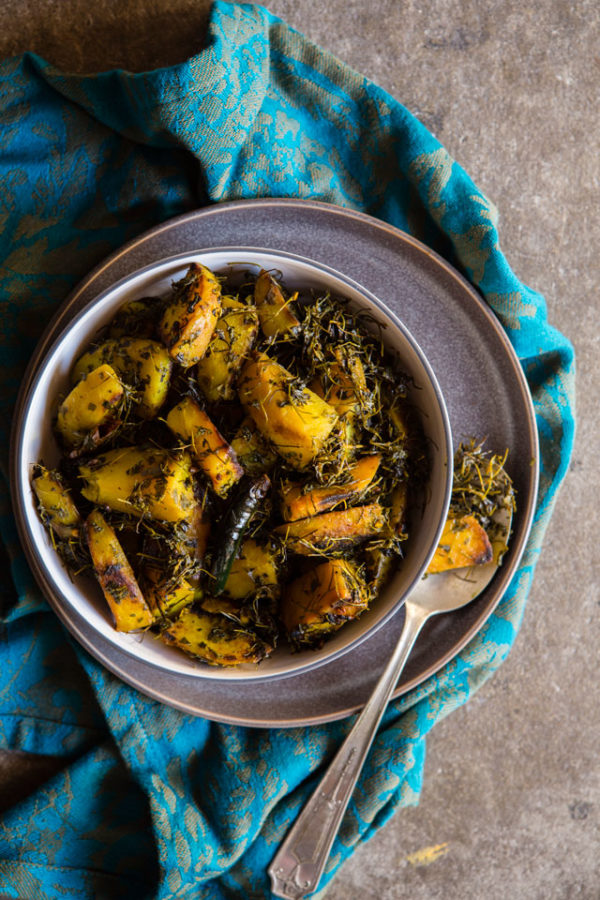
But at the same time I cannot blame anyone because I was exactly that kid years ago. Equally picky about what I chose to eat, if not more. No, definitely more! One of the many things that I hated to eat was taro root. The slippery slimy texture of it was just a big turn off for me. So much so that I’d imagine things just by the smell of it and even ended up throwing up a couple times. Arvi was an enemy! Mummy was so done with it, just like the current me. But then she also knew magic, mums just do. So she waved her wand and did magic.

Arvi Kabab

She made the most delicious “machi kababs” or fish cutlet, I had ever tasted. It was crispy on the outside, soft on the inside, with clean flavors, nothing too bold and spicy. Something a child would love. And I devoured. I ate and I ate and that dish became one of my favorites for years to come. And then years later well into my adulthood I realized that my mom lied to me and those weren’t fish kababs but actually a kabab made of the most hated root vegetable in my life. Yup, you guessed it… it was tarro! I felt cheated but also amazed by my mothers skills to make a hated vegetable into a favorite. And although I gave her a hard time at the time but tarro still continued to be a favorite and this recipe, one of my favorite ways to cook it.

So I guess instead of getting disappointed because your kid didn’t like something you worked hard on, you can just get more creative and present it in a more fun way. Lesson learned Mummy… lesson learned!

Ingredients:

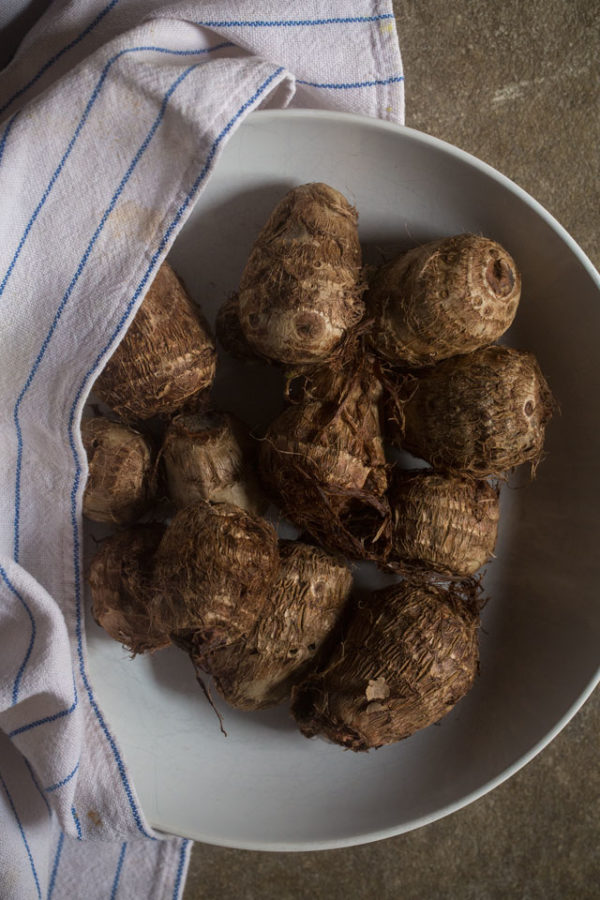
2 lbs Arvi (tarro roots), approx. 10-12 in no.

1/2 teaspoon turmeric

1 teaspoon garlic powder

2 teaspoon amchur (raw mango) powder

1/2 teaspoon cayenne (or red chili powder)

3 tablespoon cooking oil

1 teaspoon nigella

1 medium sized red onion, thinly sliced (approx. 1 cup)

1 teaspoon freshly grated ginger

Salt to taste

Method:

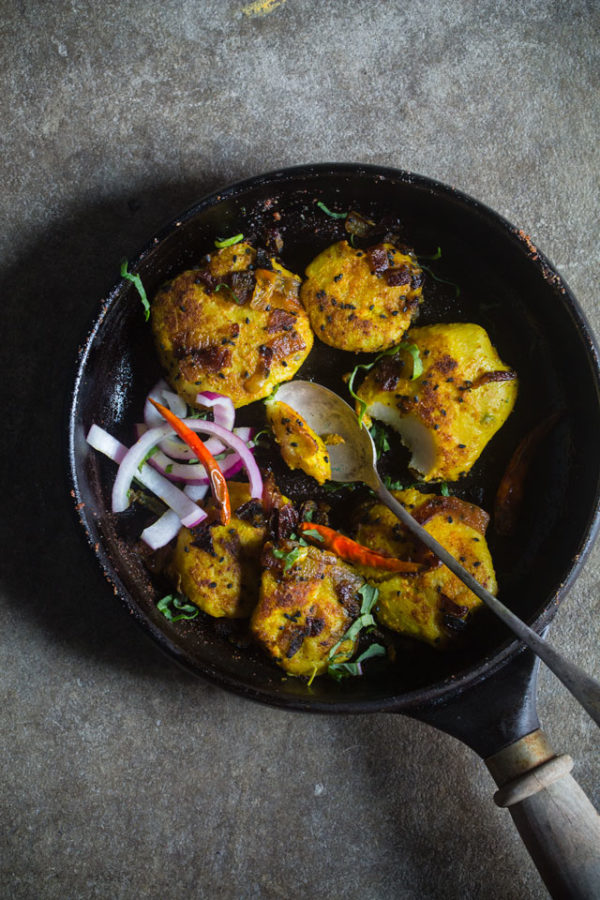
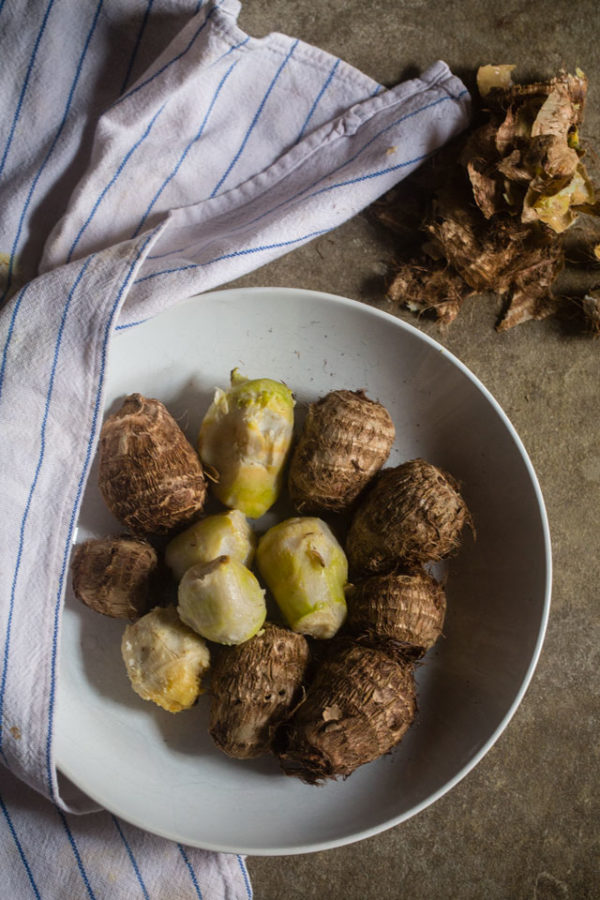
Bring a medium sized pot of salted water to boil. Drop taro roots in the boiling water and boil them until cooked through, approx. 30 mins. Drains the water. Allow taro roots to cool. Once cool to handle, peel the skin off. Oil your palms for cooked taro roots can be sticky and press taro roots between your palms to flatten them into tikkis or patties. Line on a plate and set aside.

In a small bowl bring together, all the dry powdered ingredients. Sprinkle evenly on tarro patties, both sides.

Heat oil in a heavy bottom, shallow pan. Add nigella. As it sputters, add sliced onion and sprinkle some salt (1/4 tsp). Cook onion for a couple minutes until they begin to sweat.

Carefully line taro patties on the pan and cook on medium low heat, until both sides are golden brown, flipping them in intervals. Approx. 8-10 minutes.

Serves hot with a spicy chutney as a dip, chilled beaten yogurt drizzled on top and garnished with cayenne and cilantro or as a side with steaming hot lentil soup and rice.


Chickpea- Roasted Garlic Fries AND Masala & Meatballs Giveaway

Chickpea- Garlic Fries

This post is going to be short and sweet. Sweet as my friend Asha, whose cookbook I am introducing today via this post. I’ve said this over and again, every time I am asked about the joys of being a food blogger, its the people that I get to meet through my blog is what actually brings real joy to me. I have been lucky to be doing this for a while and feel truly blessed to have made friends along the way. Some really talented, beautiful souls and Asha is one such fellow food blogger who I can proudly call a friend now. And that talented, beautiful friend has just released her first cookbook and I couldn’t be more proud.

Chickpea- Garlic Fries

Just like many of us Asha grew up in a typical middle class Indian family where her mom’s and grandmothers cooking directed her through her formative period in life. Carrying the values of her family and heritage she grew up, found her soulmate and built her home in the US where she is raising a beautiful family of four. And while doing that she wrote Masala & Meatballs  a cookbook packed with surprising recipes that are bursting with flavor, masterful photography and heartfelt stories of growing up in India and then raising a family in the United States.

Chickpea- Garlic Fries

I have been cooking with her cookbook for weeks now so I can tell you, there hasn’t been a single recipe that has disappointed me and I have cooked quite a few. Sharing one such recipe with you today. Chickpea- Roasted Garlic Fries. Being inspired by a few Indian recipes and the use of chickpea flour in the cuisine making a lot of the dishes vegan and gluten free, Asha created these chickpea polenta fries. These are surprisingly so simple and easy to make and boy, do they taste good! I might have inhaled more than a few while just cooking and shooting with them so an announcement in public serve- double the quantity if you are making for a family of four because you will end up eating half of it before the kids even know!Chickpea- Garlic Fries

Asha has graciously offered to giveaway a free copy of her cookbook Masala & Meatballs to one lucky Indian Simmer reader. All you have to do is drop a message in the comment section below and let us know why you’d like the cookbook. You can have extra chances to win your copy is you follow Indian Simmer on Instagram and/or Facebook. Feel free to leave a comment there too!

We will announce a lucky winner on the Valentine’s day. Entries open till Feb. 13th 11:59pm. Giveaway open to the residents of USA and Canada.

Chickpea- garlic fries


Ingredients:

1 cup (240g) Greek-style yogurt

1 1/2 cups (355ml) water

1 cup (120g) chickpea flour

1 tsp turmeric

1 tsp black pepper

2 tsp salt

1/3 cup (35g) grated Pecorino Romano

1 head roasted garlic, cloves squeezed and mashed

1/2 cup (8g) cilantro, finely chopped

1 tsp cumin seeds, toasted and ground

1 tsp mango powder

1/3 cup (80ml) vegetable oil

Method:

In a medium sized bowl, combine the yogurt, water, chickpea flour, sugar, turmeric, black pepper and salt. Whisk the mixture to make a smooth batter without any lumps. Check for seasoning.

Add the yogurt- chickpea mixture to a large, heavy- bottomed nonstick pan and cook over medium heat, stirring continuously, for 30 to 40 minutes, until the mixture becomes thick and has the consistency of soft dough. Quickly add the Pecorino, mashed roasted garlic, cilantro, toasted ground cumin and mango powder. Mix well. Remove from the heat and transfer to an 8-inch (20-cm) greased baking pan, smoothing the top with a rubber spatula. Put the pan in the fridge for 30 minutes to set well.

Once the chickpea mixture is set, cut it into desired-sized squares. Heat the oil in a skillet, add the chickpea squares in batches and sear over medium heat until the crust is crispy on all sides. Serve with the sauce.


Masala Egg Rolls with Rotimatic

OK, a small confession- I got to know about this “young and energetic engineer in Singapore who had developed this amazing robot that could make rotis for you, in your kitchen”, about two years back. As much as I was impressed by the determination and perseverance of this young woman who worked for 8 years to get her first prototype out, I knew I do not need it.

Around two years back, probably through a kickstarter link (or maybe another crowd funding websites, I do not remember!), a friend shared info about Rotimatic to a bunch of us, in an email. “Guys, guess what?”, the email went… “Our prayers have been answered! Finally a machine that can make rotis for us”. And then just like any other topic shared with a group of girls, this one became a conversation that went on for a long time. In this case it took shape of a long thread of emails exchanged over weeks, amongst a group of us working moms who want to feed healthy food to their family but because of their crazy, busy life, they (think!) are failing…. at keeping the house organized, keeping themselves fit, helping the kids with their homework, volunteer work…. oh, and also at feeding their family healthy food! Amongst all the different directions this conversation was taking us, splitting us in groups of the ones who thought this machine is a genius and the ones who thought it was overrated, one thought prevailed. We were thrilled that someone thought of making one and it’s exciting that “someone” is a woman!

Some of the girls actually took the leap of faith and went ahead and supported the kickstarter while some of us (myself included), tapped our finger on the table and said we will wait and watch. I did not decide on whether this machine is useful or not but I was sure I definitely do not need it. I am a food blogger who loves cooking so making a few rotis (almost) everyday might sometimes feel like a drag but I grew up cooking them, and it was part of life, so I was alright. I stayed with that belief for almost two years until I actually used this bad boy. It has been more than a few weeks since this machine came into my kitchen and I have this feeling of a guilty pleasure when I say this, but I have not made roti on my cooktop ever since. And yes, we are eating rotis pretty much everyday, maybe more than before.

Masala Egg Roll

Founders Pranoti and Rishi, did a great job bringing this machine to existence. I might be more impressed by Pranoti here (go feminism!) but they make a great team and it shows in the product that they put forward. Just like any first product, it has its pros and cons which I will summarize below but I have to say I am impressed by it, it has definitely made my life easier, it has made my friends curious and is a delight for the kids. Pretty much everyone in the butterfly’s school knows that we have a roti making machine and girls are wanting to come on playdates so they can “make roti with the robot”. I should sell this punchline to the team of Rotimatic! I have still not decided whether I would be willing to spend that money (considering the price tag) but now I definitely know that I want one.


Masala Egg Roll

If you are looking to buy a Rotimatic to make your busy life a little smoother and healthier, I totally recommend it. Rotimatic is offering a discount of $100 to the readers of Indian Simmer if you follow this link.

A Few Quick Things About Rotimatic:

  • World’s first and only fully automated flat bread making kitchen robot. Only product to use advanced technology and robotics in the kitchen segment
  • 15 sensors and 300 microparts in synchrony, 10 motors and 32-bit microprocessors.
  • Mimics human judgment while kneading dough, learns and adapts, gets smarter with every use. Adapts to different types of flours.
  • Connects to Wi-Fi. Remote app (to be launched soon).
  • Makes all kinds of flatbreads like Roti, Tortilla, Puri, Mini Pizza etc.
  • Has three separate compartments for flour, water and oil. You fill the ingredients and Rotimatic does the rest.
  • Makes about 1 roti every 90 seconds.

Pros: 

  • Of course the convenience is a big pro. You have fresh, homemade roti at your table anytime you want without moving a finger. Well, ok you might have to move your finger but you know what I mean!
  • Its easy to clean. Can just throw the parts in the dish washer.
  • Cloud- technology makes the software updates easy. You just need to connect your machine to the wi-fi.
  • Very simple to use with just push of a button so I know even if I am not home my husband or even my 8 yr old can cook some rotis and feed themselves. That’s a big deal for me. One less thing to worry about.

Cons:

  • For me the biggest problem is the price point. I got the same feedback from the friends who also have a busy life and love the convenience of the machine. At $999 this machine is a little heavy on the pocket.
  • Noise is another thing that people have a problem with. For me its not really a big negetive because its like any other loud blender we use in our kitchen.
  • Size of the machine can be another drawback. It will ask for a good chunk of space on your counter.

I made some Masala Egg Rolls using the rotis made in Rotimatic. Masala Egg Roll is my take on a traditional street food, Calcutta egg rolls. Its a simple recipe made even simpler with the use of rotimatic.

Masala Egg RollIngredients: Makes 8 rolls

8 Rotis (I used rotimatic) you can also use this recipe

6 eggs

1/2 teaspoon garam masala

1/2 teaspoon red chili powder

1/2 teaspoon salt

1 teaspoon cumin seeds

approx. 2 tablespoon- cooling oil

Chili sauce (as per taste)

1/4 cup red onion (thinly sliced)

1 tomato (thinly sliced)

Cilantro

Method:

Heat a heavy bottom pan over medium low heat. Add approx. 1/4 teaspoon oil. Add a pinch of cumin seeds. As they sputter pour a ladle of egg mixture. Swirl it around to make an omelette the size of the roti. Before the egg sets, place a roti on top and press down gently. Once the egg is cooked flip the roti. Remove from the pan and place the egg side up.

Repeat the same process for the rest of the eggs and roti.

Spread chili sauce, on the egg side of the roti. Arrange sliced onion, tomato and cilantro in a line. Roll up into a roll.

Serve with hot chai.

Disclaimer: This post was sponsored by Rotimatic. However the recipe and opinion expressed here is solely mine. Please follow this link to get a discount of $100 on your Rotimatic machine. 

Beetroot Paratha and LunchBox Mealplan

beetroot Paratha

Its just funny how much my kids have started liking this paratha. Not just liking but this is probably on their list of favorites now, considering how they were put off by the mere idea of adding beetroot to anything. And then one day I just made “red parathas” for them, smeared some nutella on it, because you have to admit, anything tastes good with a little nutella on it, rolled it up and put it in front of them. 

Well it looked different. Lucky me, it was “good” different for them and they gave it those “red parathas” a chance. They loved it. Yay! So the vegetable that was a big no no for them suddenly became a favorite. Now the days I pack beetroot parathas in their lunchbox are happy days because the lunchbox always comes back empty. All I had to do was wrap the same food in a different cover and all they had to do was try!

Another thing I did what I think also made a difference was that I baked the beetroot this time instead of just pureeing it raw and that I think cut the earthy or slight bitter aftertaste and brought out the sweetness in it which by the way, I am addicted to! Baking also makes handling and specially peeling of beetroot much easier. So just wash the beetroot. DRizzle a little olive oil, wrap in aluminum foil and bake until fork tender. Be sure to let the beetroot cool down a little bit before handling it. Once cooler, just drop it in the food processor.

I also used minimal ingredients for this recipe because, maybe its my secret addiction to baked beetroot but I feel beetroot in itself has flavors enough to take over this dish so adding too many spices or other strong flavors will only do an injustice to it. Parathas should have clean flavors and only one or two ingredients should dominate it because later you are also going to pair the paratha with some kind of a dip or vegetable preparation so cleaner flavors the better. But at the same time this beetroot paratha in itself can be a meal which I find very convenient specially when you are on the go or when you have to pack it in lunchbox. Just roll it up and enjoy. By the way, this might be unrelated (although not as much) but check out this post by Bon Appetite, read a few things that might be helpful when dealing with beets. beetroot paratha

If you follow my instastories then you might know that as part of my 2018 resolution of being more organized in work and personal life, I’ve been very religiously using calendar, making lists and meal plans. Everything from appointments to blogposts to what I am packing in my kids’ lunchbox. And that has been helping me immensely! So as promised I will be sharing my monthly #inherlunchbox meal plan for each month starting this month. In the beginning of each month you can come here and check out OR download a lunchbox plan for the month and hopefully that will make our lives a little easier, specially the mornings on weekdays. I will also try to share a grocery list from next month so that shopping gets easier for us too. Lets do it together. It’ll be fun!

[pdf-embedder url=”http://www.indiansimmer.com/wp-content/uploads/2018/01/February-Meal-plan-2.pdf” title=”February Meal plan”]

Please find a meal plan for February 2018 and do let us know your feedback. That will help us improve.

Ingredients:

Beetroot- 1 medium sized

Whole Wheat Flour- 1 1/2 cups

Fennel Seeds- 1 teaspoon

Salt

Water

Ghee or cooking oil of pan frying

Method:

Pre heat the oven to 350 deg. F.

Wash the beetroots. Pat dry. Chop the leaves and ends off. Drizzle with olive oil. Wrap in aluminum foil. Bake for 30-35 minutes until fork tender.

Pull out of the oven. Let cool before peeling the skin off. Chop. Transfer to a food processor with the rest of the ingredients. OR, puree the beetroot if you do not if you do not have a food processor.

Mix all the ingredients together and add water to knead it into a smooth dough, either in the food processor, standing mixer of with hands. The dough should resemble that of a roti or paratha.

Cover the dough with a damp cloth. Set aside for 10 minutes.

Knead the dough for another minute to make it smooth. Divide the dough into 8-10 parts. Roll them into balls.

Dust the rolling board with flour. Dust one dough ball liberally with flour. Roll it into a flat circular disk. Repeat the same with all the dough balls. Cover with a damp cloth.

Heat skillet on medium high. Place rolled dough onto skillet. Cook for 18-20 seconds or until dough turns darker and small bubbles break the surface. Flip. Cook for 18-20 seconds. Brush ghee/oil on surface. Flip. Cook for 15-18 seconds or until golden brown spots appear on the surface. Flip. Repeat. Remove from skillet when both sides are cooked.
Serve hot with a side of currychutney or raita.

Indian Inspired Bruschetta

Indian Inspired Bruschetta

Let me just warn you, this is going to be a photograph heavy post. Mainly because I took too many of them while working on this recipe and that is mainly because I was happy (read buzzed) while working on this one! This is the beauty of working as a food blogger. You get to meet some of the most amazing people in the food business, you get to try some of the most interesting and (most of the time) delicious flavors and as part of the “job” you sometimes get buzzed while working. This was one such day for me and I am proud of it!

Indian Inspired Bruschetta

Red wine is my choice of drink on any given day. Night out with the girls, date with the husband or a crazy weekday filled with the deadly “work life balance”, a glass (or two!) of zinfandel, cabernet or Pinot gives me company. So I was intrigued when I was introduced to this “new to me” wine, Le Focaie by Rocca Di Montemassi, grown by the Zonin family in Tuscany.

Indian Inspired Bruschetta

Indian Inspired Bruschetta

At first taste I found the flavors to be me more intense and fuller than I am used to but then it slowly grew on me and I started enjoying the same things that caught me off guard initially. I am not used to cooking with wine too much so I was not sure what recipe might go well with the cherry and wild berry notes of this wine so I chose to pair with a food instead of cooking with it. Cold cut meats, moderately aged cheese and bruschetta were some obvious choices that came to mind.

Indian Inspired Bruschetta
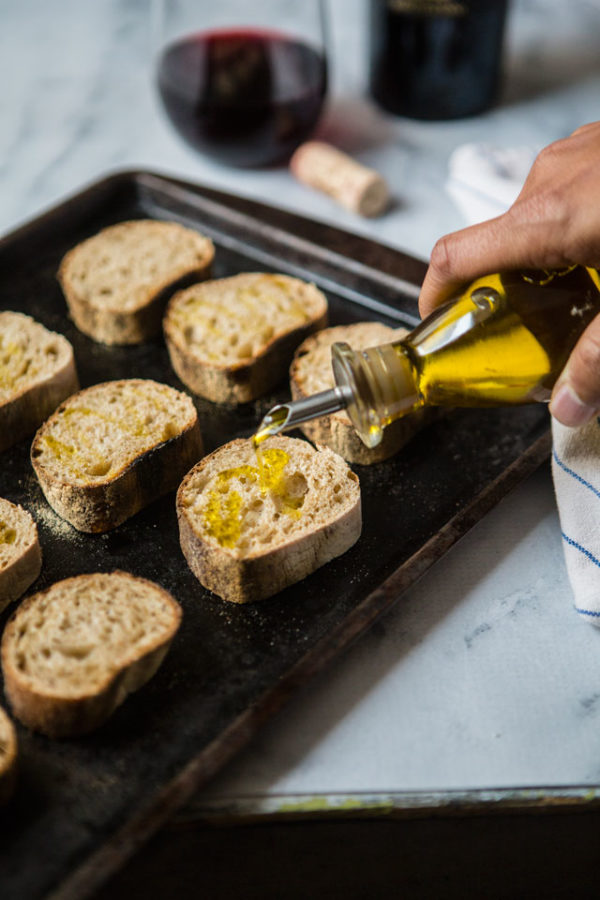
So I developed this bruschetta recipe probably because bruschetta also happens to be my choice of finger food to go with wine. I married a few mild Indian flavors to balance with the punch of La Focaie. You can hold off on the hot cilantro chutney here if you are not accustomed to the heat but I felt the zing of lemon, kick of chili and the after taste of garlic worked well. This is also a great simple recipe for when you entertain. Comes together in minutes and also scales easily.

Indian Inspired Bruschetta

Let me know what you think!

Ingredients:

Cherry tomato- 1 cup (cut into quarters)

Canned Chickpeas- 1 can, 14oz (drained and run under fresh water)

Olive Oil- 1 teaspoon + extra for the baguette

Shallot (chopped)- 2 tablespoon

Cilantro (chopped)- 1/4 cup

Sweet Pepper (chopped)- 1/2 cup

Fresh Paneer (Recipe Here)- 1/2 cup

Roasted cumin seeds (coarsely ground)- 1/2 teaspoon

Cilantro Chutney (Recipe Here)- 1/2 cup

1 rustic french baguette

Salt and Pepper

Method:

In a large mixing bowl bring together cherry tomato and the rest of the ingredients except for cilantro chutney and baguette. Set aside for 15 minutes.

Preheat the oven to 400deg. F.

Slice baguette, half inch thick. Line on a baking sheet. Brush olive oil on the slices. Bake in the oven for 5-8 minutes until lightly toasted. Pull the slices out of the oven.

To serve, place 1 tablespoon of tomato, chickpea salad on baguette, drizzle some hot cilantro chutney on top and serve. This indian inspired bruschetta goes very well with Le Focaie which is a full bodied red wine that has a pleasant notes of of cherries and wild berries.

Disclaimer: This post was sponsored by Rocca Di Montemassi. However the recipe and opinion expressed here is solely mine.

Chocolate Dipped Lemon Shortbread Cookies

Chocolate dipped Sugar Cookies

I have been holding off from sharing this recipe for quite a while now. I am not exactly sure why. Well, one of the reasons could be that these are so sinfully good that they fly off my kitchen counter before I could even manage to take photos of them, let alone sit and write about them. Even in the last 2 weeks I have baked them with the kiddos three times. First for the neighbors, then for the delivery guys and then for no reason at all other than that we wanted to munch on some.

Chocolate dipped Sugar Cookies

They really are that good! Crumbly because of the generous helping of butter, as it should be. Refreshing because of the intoxicating citrus flavor and the bitter sweet chocolate just makes it rich and satisfying. And may I also add, the use of sour cream in melted chocolate is a sheer genius that “yours truly” created. Not playing my own trumpet, but it is (a little bit)! Chocolate dipped Sugar Cookies

Although for me the best part was that it was super easy  to make and also fun, so the kid enjoyed making them over and over. Good quality time spend with the kiddos over holidays, getting dirty playing around in the kitchen! Still on our schedule to make one last batch with them, right after I am done writing this. As we enjoy these last couple days of holidays and before the party is officially over and its time to get back to school and work. Arrghh!!

Chocolate dipped Sugar Cookies

But lest not worry as we will still find company in these comforting shortbread cookies. To be dunked in our milk or pair with tea before we rush out the door next week. To be discovered in their lunch boxes to put a smile on their faces during lunch breaks. And to be stolen out of the tin canisters by the little thieves in our household. So I guess there is still hope for us in 2018 and these cookies are a proof!

Chocolate dipped Sugar Cookies

Ingredients: (Shortbread recipe loosely adapted from HERE)

6oz (1 1/2 cups) butter (softened)

3/4 cup granulated sugar

2 cups all purpose flour

1/2 teaspoon lemon extract

zest of 1 lemon (approx. 1 tablespoon)

1 1/2 cup bittersweet chocolate chip cookies

1 tablespoon sour cream

Method:

In a large mixing bowl, using the paddle attachment of a stand or hand held mixer, cream together butter and sugar. Once light, add lemon extract, lemon zest.

Turning the mixer speed to low, add flour in small portions until everything is incorporated well together. Take the dough out of the bowl. Divide into two equal parts and flatten into disks. Cover with plastic wrap. Let it chill in the refrigerator for a min. of 30 minutes.

Preheat the oven to 350deg. F or 180deg. C.

Roll the disks to 1/4 inch thickness. Using cookie cutter, cut the dough into shapes of your choice. Line on a baking sheet, lined with parchment paper. Bake for 10 mins or until the sides begin to turn golden. Pull out of the oven. Allow it to cool.

In a double boiler, melt the chocolate chips. Stir in sour cream. Mix well. Transfer into a deep bowl, with mouth wide enough to be able to dip the cookie. Dip half of each cookie in the melted chocolate. Place finished cookies on a baking sheet lined with parchment paper. Let the chocolate harden before storing the cookies. Can speed up the process by placing the cookies in the refrigerator for 10 minutes.


World Vision

Blogphoto
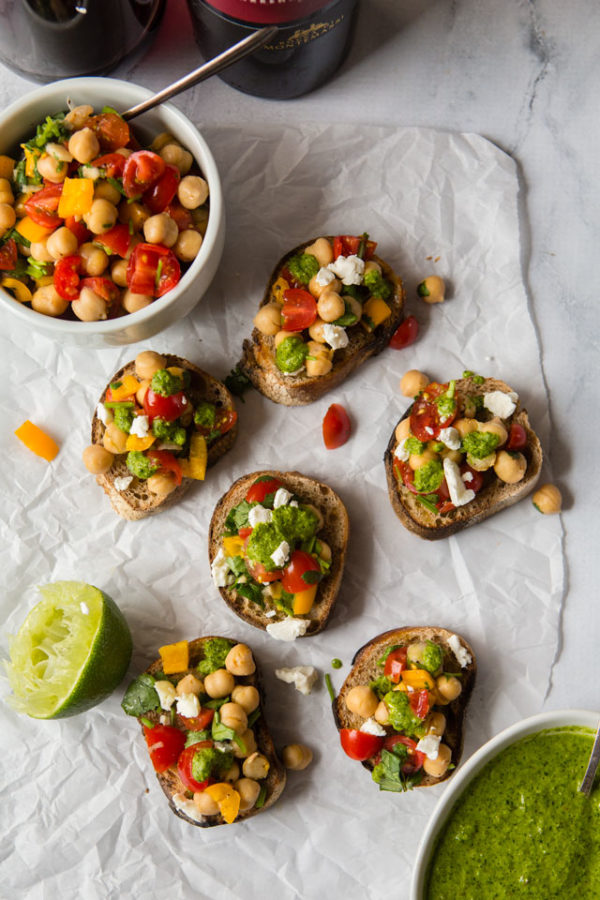
After school when I went off to college, and then later on while working, I stayed at a private girls hostel. I lived in that place for over eight years and shared room with almost a dozen roommates at one point or another. When you share a room or space with people, you slowly come closer, share things with the person and they slowly become a part of your life. Some of them you get along very well, some constantly irritate you, some become close friends and then there are some who leave a mark.

I had one such friend who began as being just a roommate but then slowly became an integral part of my life. A beautiful soul, an independent young woman and a nurturing person. Although she had a childhood full of struggles, details of which I wouldn’t go into but after a series of hardships she somehow turned up at the door of a covent orphanage, at the tender age of 3. She and her older sister, who must be 5 at the time. I’d like to keep her identity private but knowing her for over 15 years now, I have never heard a word of struggle or hardships from that period so I will not convey that either. She and her sister were lucky to have received the sponsorship from a german couple, for their studies etc and very soon the family also adopted the sisters. So all I have heard of her childhood are the stories of her trips to Germany and of her Tante and Onkel!

Today she is a doting mother, a loving partner and a successful career woman. So is her older sister. Tante and Onkel aren’t around anymore but the two sisters are carrying their legacy. I do not believe in fairytales and neither do I believe in luck. I do although believe in destiny and I think this was hers.

But we also cannot ignore the fact that some really hardworking people and beautiful souls work day and night, selflessly, to bring many such children closer to a life better than the circumstance brings them to. One such organization and group of people I totally love is World Vision.

World Vision, is a Christian humanitarian organization helping children, families, and their communities overcome poverty and injustice. They touch lives of families and specially kids living under immense poverty, across the world in almost 100 countries across Asia, Africa, and even here in the US. They work tirelessly towards their better health, education, economic development, gender equality and addressing basic problems like hunger, hygiene and clean water. 

(Image Courtesy: World Vision)

I have been with them for the past two years and their dedication still amazes me. I guess its the faces like these, that keeps them going.

Please please please visit their website and learn more about what they do, how they do it and if there’s a way you can help them with their mission. For example, if by spending just a few dollars a month, you can sponsor a child and help him or her with her education. Or buy a gift basket of some absolutely gorgeous handmade products which you can very well use at home and as a result the money you spend goes towards building someone’s house. There’s much more information on their website that might answer all the questions you might have. So please, this new year try and change a life!

Disclaimer: This is not a sponsored post but a collaboration with World Vision to spread the word about the work they are doing. World vision provided us with the featured products in their gift basket for photography purposes. All the opinion shared in this post is solely mine. 

Beetroot, Kale and Quinoa Salad

Beetroot Quinoa Salad

Setting gears for the jolly good days? Twinkling lights, aroma of baking cookies filling up the house or that of simmering mulled wine, chatter of the loved ones and the non stop eating. YES, the non stop eating! Preparing yourselves for that? I am!

I might have told you before that I am on a weightloss program for the past 3 months. Well, more of a “feel good” program! When you have one kid and then the other and then just some how life takes over in the name of cooking and cleaning and meal times, and laundry and scheduling, you suddenly realize after years that there’s one person who has long been forgotten… YOU! You forgot that your duty was also to take care of yourself and your health and the way you look and feel abut yourself. So 3 months back I decided to go back to loving myself. And slowly and steadily I am getting there.

Beetroot Quinoa Salad

Eating the right kind of food, in proper proportions has been a big part of this program of mine. Of course, like everyone else, I love me some good food! And I am talking about all the burgers and medium rare red meats and those cakes I can find. But honoring my body by also filling it with good wholesome, healthy food at the same time has helped me a lot. So while I gear up for some hearty holiday cooking and munching, I am also planning how to balance that diet with some healthier compliments.

This Beetroot Kale and Quinoa Salad is on top of that list! I am literally addicted to this salad and love it so much I swear I’d give up on cake for this….. I am serious! Try it and you will know why. The earthiness and mild heat of mustard, with the sweetness of honey paired with the punch of lemon just works so so well. And toasted nuts and sweet discoveries of grapes in them with the bitterness of kale, just makes it a whole heart meal in itself.

Ingredients: (Inspired by Playful Cooking)

2 cups cooked quinoa

1 medium sized beetroot

2 cups curly Kale (deveined and chopped)

1 cup grapes (any variety) diced

1/3 cup almonds (toasted and coarsely chopped)


For the Vinaigrette:

Juice of one lemon (approx. 2- 2 1/2 tablespoon)

1 clove garlic (minced)

1 tablespoon shallot (minced)

1 1/2 tablespoon honey dijon mustard

1/4 cup extra virgin olive oil

Salt and cracked pepper


Method:

Clean the beetroot. Peel the outer skin. Rub olive oil. Cover in aluminum foil. Bake in the oven at 400 deg. F for 45 minutes or until fork tender. Take out of the oven. Allow it to cool before dicing into cubes.

Bring all the ingredients of the vinaigrette together in a mason jar. Tighten the lid. Shake vigorously for 15 seconds until all the ingredients are well combined. Set aside. Can also store in the refrigerator for days.

In a large salad bowl bring all the ingredients of the salad together. Pour the vinaigrette and toss everything well for the vinaigrette to mix well with the salad. Serve immediately or refrigerate for 1-2 days until ready to serve.